ClyphX Pro
Patreon and Discord
update: After working on this thesis I became a real expert in ClyphX now and it is likely you found this site because you are interested in how ClyphX works. I do offer now a patreon, where I make tutorials (on youtube as well and there is a Discord server very much alive where a good community is evolving.
Visit:
my patreon: https://www.patreon.com/schlapbe
Youtube Channel: https://www.youtube.com/@clyphxpro
Discord server: https://discord.com/invite/J9xnYQUhSE
now, that out of the way, here is the original article:
First, a quick history of control surface scripts:
One of the innovations ABLETON LIVE brought into the world of DAWs, was its capability to be connected to all sorts of hardware controllers. There are many different controllers on the market, dedicated to the software. Probably the most successful unit ever sold is the Launchpad, which was released in 2009 by Novation. It has a 8×8 grid illuminated button matrix and reflects visually what is happening in the software.
The communication between hardware and software is handled by a control surface script, written in the programming language Python.
When you bought a hardware controller, in most cases the manufacturer had written a script for ABLETON LIVE which was delivered with the software. You simply had to tell the software which controller it was and it was integrated seamlessly.
It is the ease of use, which made this concept so popular.
What is ClyphX Pro?
Developed by Sam ‘Stray’ Hurley, ClyphX is a control surface script. It is not bound to one specific piece of hardware. It can be controlled from different sources with little commands such as, for instance, “METRO” (for turning on/off the internal metronome) or “bpm 115” (to set the tempo of the project) which you simply write in a clip’s name.
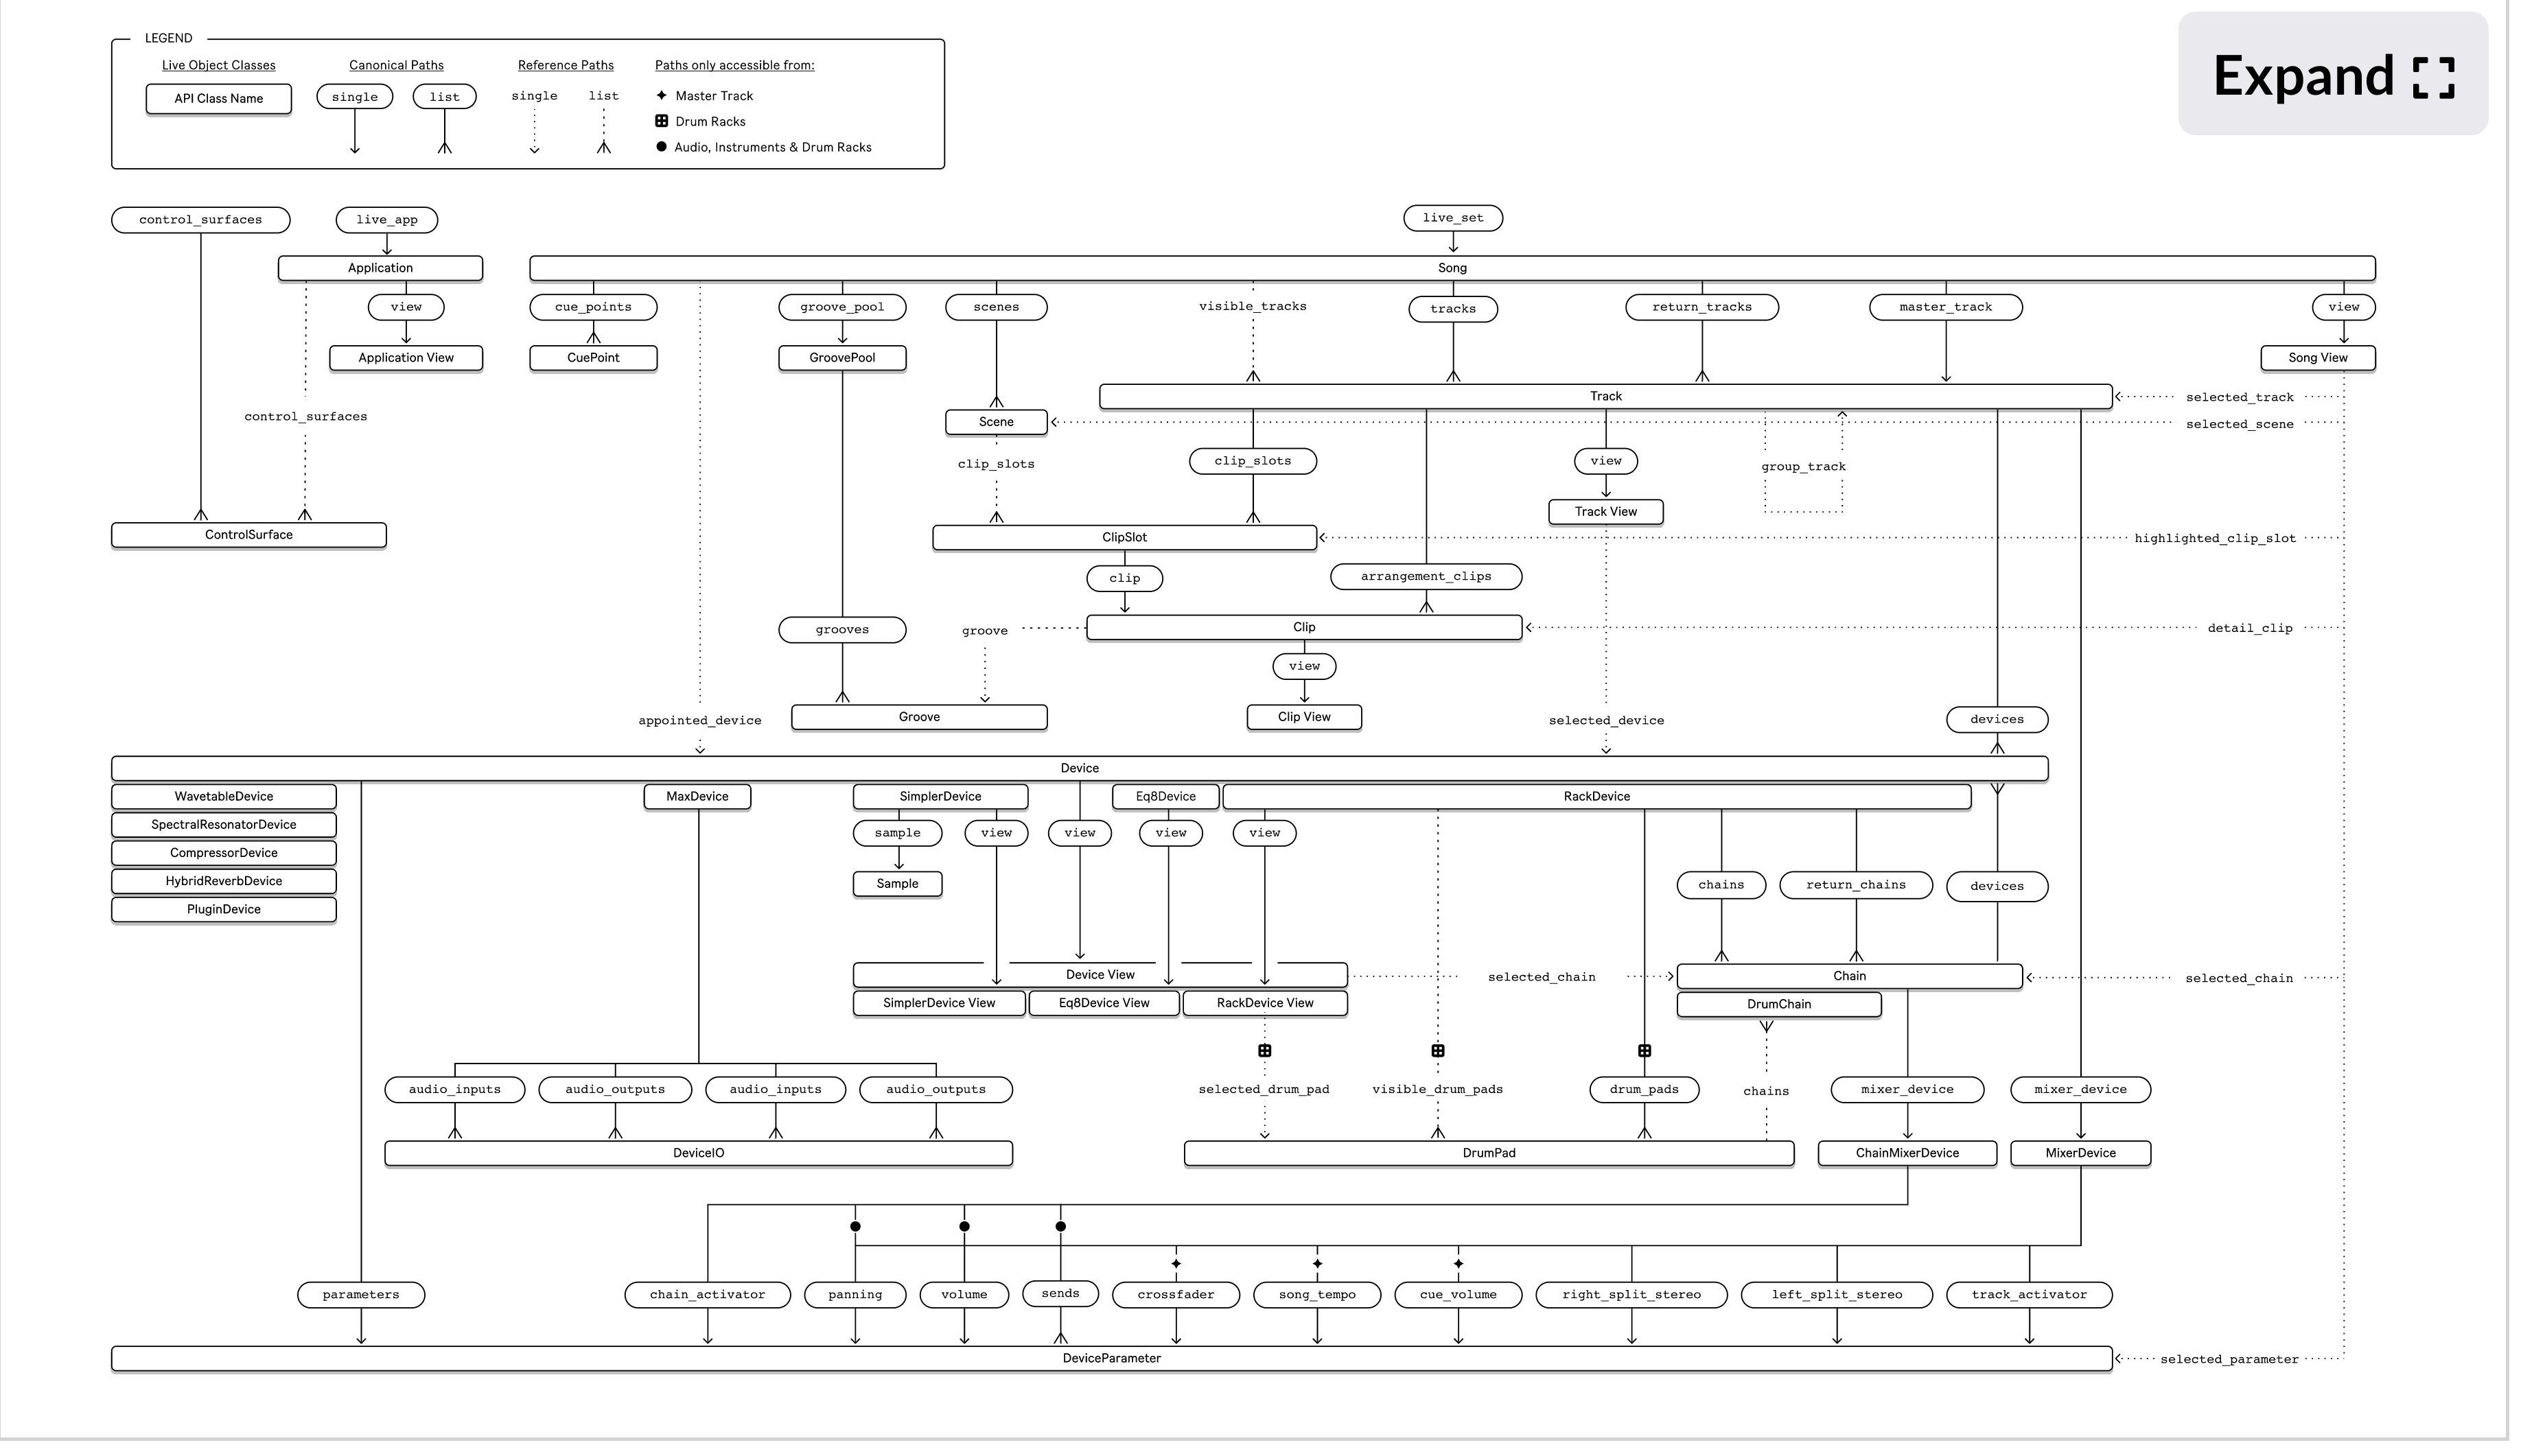
You can control and access everything which is controllable via the ABLETON LIVE API or LOM (live object model) without diving into python programming:
It is possible to program any midi controller to do almost every command / action. Some of this is possible with the built-in mapping function of ABLETON LIVE, but you would have to re-map everything every time you start a new project.
Furthermore, with ClyphX Pro you can combine different pieces of hardware to interact. Best of all, you can add a custom python code to extend your needs of control.
For this reflection report I want to give you some examples of how I used specific ClyphX Pro functions to customise my setup and made it as accessible as possible, and tamed the complexity that comes with it.
short examples
BINDINGS
Binding is a part of ClyphX Pro to bind a controller to a specific parameter in ABLETON LIVE. e.g. I connected the sends of my 8 loop tracks to my Midi Fighter Twister in such a way that I have full visual reflection of what loop in Ableton goes to which external guitar pedal. These bindings are dynamically reassigned by pressing knob 1-8 for loop track 1-8.
I wrote an article about how I proceeded here.
X-MODES
X-Modes enables different commands for the same button. Like a (multi-)shift button.
In my setup I use this, for example to use buttons 1-8 on my Launchpad X for different purposes:
When I hold down the MUTE button, LOOP TRACK 1-8 can be muted or unmuted.
When I hold down STOP, any clip playing in LOOP TRACK 1-8 stops playing.
When I hold down PLAY, the clip (in the selected slot) will start playing in LOOP TRACK 1-8
When I hold down MATRIX SAVE, a snapshot of my matrix gets saved in preset 1-8
When I hold down MATRIX RECALL, the snapshot 1-8 gets restored.
There are so many more examples when I use this, there would be too many for this report. A chapter in my tutorials will be linked here: X-MODES
G-Controls
With ClyphX Pro you can define different functions depending on how long you hold down and when you release a button. This is a real game changer for my foot controller Behringer FCB1010.
For example, when I press button 1 and let it go, I will immediately record “LOOP 1”. When I press the same button and hold it down for a while, it will abort the recording or stop the loop from playing when already recorded.
This is done by measuring the duration between a NOTE ON and NOTE OFF midi event of a controller. You can use different actions for
- PRESSED (every time the button is pressed)
- RELEASED (every time the button is released)
- PRESSED DELAYED (only when held down for a while)
- RELEASED DELAYED (only when released after a longer press)
- RELEASED IMMEDIATELY (only when released shortly after pressing down)
MACROS
Macros are widely used in other applications. In ClyphX Pro you can combine a list of commands which are often used. They are defined and called with a dollar sign before and after the macro name. ($macro$)
I use them intensively in conjunction with Variables. Then they become very powerful.
Variables
In ClyphX Pro you can use variables. e.g. in my setup I use a variable for how many bars I want to record in a loop. (%recbars%)
I can set the length with buttons on my Launchpad X.
In a macro for recording: \$record-loop\$ every parameter regarding the length for the recording is used with the variable. Same goes for the track and scene(slot) in which the loop will be recorded.
One macro for all1.
Without variables and macros I would have to write a list of actions for every possible combination of bar length, slot and track.
OSC Output
OSC stands for Open Sound Control and is a protocol developed in the 1990’ies for a lightweight exchanges for musical data over a network. Different to MIDI, it can handle strings (text messages).
ClyphX Pro can send out BINDING data or strings over OSC. I use this in my setup to send data to an iPad to have a detailed overview of what is going on in my live set. E.g. Which scene is actually playing and which will be next. I can also add instruction notes like “bowed upper melody starting on E”.
Note Trigger Handler
A note trigger handler is a M4L device which works together with a drum rack. With each pad in the drum rack you can trigger an ClyphX Pro action. You use a midi clip in which every midi note triggers your desired action.


This is very helpful when time critical tasks should be triggered after a fixed time length following a scene that has been triggered.
BINKLOOPER works in a similar way, although it is very limited in functionality and very cumbersome to edit.
In my current setup I use 5 different Note Trigger Handler.
Track & clip names
In ClyphX Pro you can reference a track or clip to its name. E.g. I have linked the volume and mute function of a track called “CLICK” to a rotary knob on my Midi Fighter Twister.
That means that, in any live set I work, if I create a track and rename it to “CLICK”, I have volume and mute control linked exclusively to this knob on my Midi Fighter Twister without any mapping.
Another great aspect is that, by referring to distinct track names, it is fail-safe to the position of a track in a live set.
side notes
This software has a vivid and active user community. There is an active forum and a Facebook user group. After I discovered and started using this software, the creator Stray disappeared. He was most responsive and helpful on the forum. But without any announcement, he just vanished.
There were wild rumours and desperate guesses about his whereabouts. It turned out he was hired by ABLETON LIVE and probably he had to sign a strict NDA.
With the update of ABLETON LIVE to Version 11, ClyphX Pro stopped working. My whole master research project was heavily relying on ClyphX Pro. I was in shock.
Long story short:
Stray updated ClyphX Pro and it is currently tested in a closed alpha group, of which I am a proud member. Good news: everything works. Well, everything besides OSC Output. Yet.
My hopes are that ClyphX Pro will be integrated into ABLETON LIVE like Max 4 Live was.
Summary
In my opinion, ClyphX Pro is an incredible powerful tool to bend the control over ABLETON LIVE to your needs. Sure, it has a steep learning curve and for sure, learning to code in Python is not everybody’s cup of tea.
To read more about what I did and how you could use this software (there is a free version) check out my tutorials and examples.
But everything seems possible to do. I did spend a big amount of time to get into ClyphX Pro and to the point where I am now, but every time I make music with my setup and everything works, it unleashes a great energy and flow of making music without caring about the question “How can I make this or that work?”. I simply press the button for this function.
back to master thesis overview
- “It is more complex in my setup though, because I use note trigger handler to record loops, but it is a very good example of how variables and macros can simplify task dramatically.” ↩︎