Yesterday was kind of a big day or let’s say a big step forward. Since I started my solo project, I had many morning jams, which were totally improvised and great for exploring the possibilities of my pedals. But I knew that, at some point, I had to take a turn and work on more structured forms. The whole point of building this complex setup as accessibly as possible was to be able to “script” a looping sequence like in this video, in which I still work with the bink looper*:
Mo’Better Blues – solo bass performance.
It turned out to be more challenging than expected, but once I got unforeseen difficulties sorted out, it now works perfectly well and is as reliable as wished!
composing concept
I thought it would be a good idea to take another approach to start the track. So I decided not to use any pedals for the writing process and instead build up a classic layered looping piece. It is easy to get lost in a sound an effect produces. And at the end of the day, I would have had much fun playing and exploring sound, but not get any composing done, really.
That being said, I came up with this two-bar loop with three voices where I doubled the lowest voice to have a phasing stereo effect. Tonally, it is basically in G-minor. It was very diatonic at first, but I searched for more spicy, more colourful notes and navigate in a close voice leading as well.
At first, it was something like this:

and here is the spiced version I came up with later:

I tried to maintain the impression of the essential chord movement and searched for option notes, like 9,b9 or #11.
For the bass line I found, I did a twist on the dominant D7/F# and turned it into the tritone substitute Ab7. It is a classic bass player move though.
How to write a melody? In the past, I played around until I found something I liked. But I find it hard not to noodle around and find a melody somebody can sing along to. A good melody should be sung in my opinion. Instead of scratching out not-so-well-intonated notes in the higher register of the bass, I sung and recorded that. It felt quite natural to me and I quickly found a melody line I liked. This method is probably quite common and obvious, but it cost me quite an effort to do it.
So, this is the melody I finally came up with:

For the second voice I followed the same workflow, I first went for the obvious third below but then tried to spice it up and it goes like this:

implementation or “reverse engineering”
Now that all musical ingredients are ready on the table, I had to figure out how to turn it into a straight, efficient looping performance.
My first attempts were to write every command needed in a X-clip following the order in which I push my buttons on the launchpad and then trigger it with a button on my foot controller FCB*.
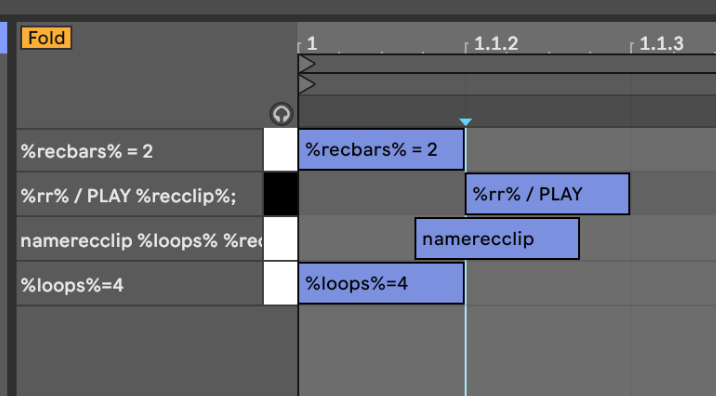
To record 4 loops on tracks 3-6 on scene 1 with 2 bars each the CXP* commands would look like this:
[1st] %slot%=1; %l1%=%looptr3%; %l2%=%looptr4%; %l3%=%looptr5%; %l4%=%looptr6%; %recbars%=2; %loops%=4; namerecclip %recbars% %loops%; %rr%/play %recclip%;
- Let me explain it in more detail:
- %slot%=1
- This sets the variable in which scene the loops will be recorded.
- %l1%=%looptr3%; %l2%=%looptr4%; %l3%=%looptr5%; %l4%=%looptr6%;
- This defines in which tracks the loops will be recorded. As I start with a kind of second voice, I wanted to have tracks 1 and 2 reserved for a bassline, I put them on tracks 3-6. The variable %looptr3% contains the actual name of track 3. I decided to work with variables so that I don’t have to correct all those commands in case I change the name of a track.
- %recbars%=2; %loops%=4;
- is pretty self-explanatory. The length of the loops is set to 2 bars and it will record 4 loops in sequence.
- namerecclip %recurs% %loops%; %rr%/play %recclip%;
- This is a simple user_action I programmed myself in python. It takes those two variables and puts them into a string. In this case, the name of the clips is “rec-4loops-2bar” for the un-quantised and the second is “unarm-4loops-2bar”. The actual recording is done with two clips, one is un-quantised and triggered immediately and another one is triggered at the next beginning of the bar. That allows me to control the timing of the recording process. Arming and starting unquantised the recording is just fine, but the un-arming of a track too early would cancel the recording. Or, quantisation the recording has to be done to apply any quantisation.
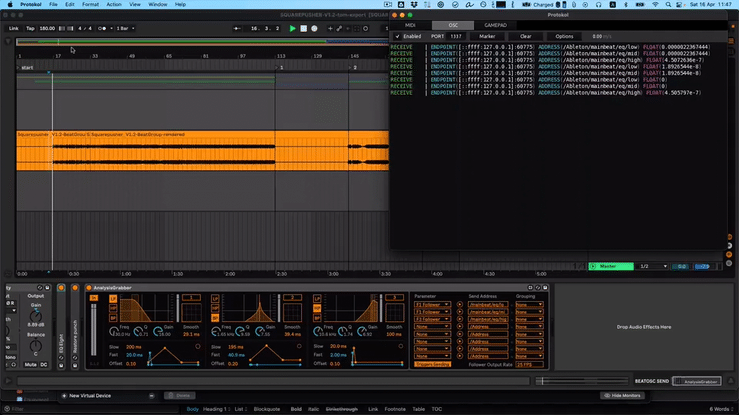
Here are images of those two clips:


Unfortunately and surprisingly it didn’t work. It was unreliable and Ableton recorded in wrong tracks without stopping e.t.c. I had a presumption of what was wrong and after testing, I found the problem. As in music, timing is critical. As mentioned earlier, I use a user_action* to generate the right clip names. Usually, every action in an action list is executed one after another. But not with user actions. It took a few milliseconds too long and the command play %recclip% started before the variable %recclip% was set correctly. My solution was to use a NoteTriggerRack which is very helpful with time-critical actions.
I left the assignments for the loop-tracks in the X-Clip and put the other actions into a NoteTriggerRack. I delayed the user_action naming and the recording clip trigger and that made it dead-proof.
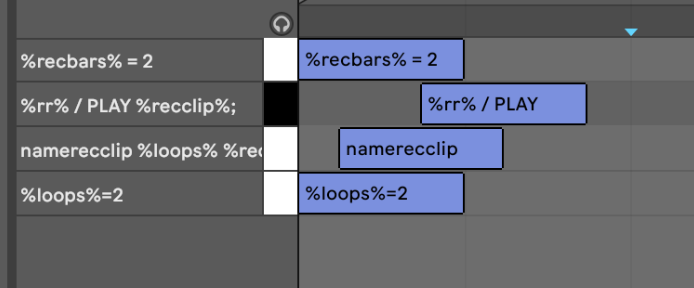
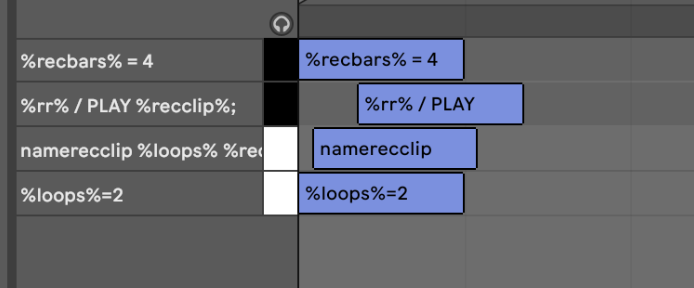
Same for the bassline and melody:
With this setup, I simply press the scene trigger button on my foot-switch(FCB*) anywhere in the bar before, and everything is just fine.
Refinements
What if something goes wrong and I have to cancel a recording or re-record? Of course, that happens and it’s important to have a fallback safety net.
I shuffled my foot-switch(FCB*) assignments to find a configuration that is intuitive for me. In my experience that can’t be planned, I had to try and refine, try and refine, etc. After a day of playing and refining, it now looks like this:
Focusing on four buttons, two pairs in two rows on top of each other.
All of them have a secondary function (short or long press GC*)

9 is scene up(short press) – nothing yet(long press)
4 is scene down(short press) – scene trigger(long press)
10 recording cancel(short press) – undo (long press)
5 trigger next scene(short press) – recording loop sequence(long press)
beat
A short note on the beat I play later on in the video: That was completely spontaneous. I recently changed the whole setup on how to trigger drum sounds and it is still in a rough state. It is also one of the areas I will work on next. I have got a clear vision and plan for how to tackle this. I will use the Ableton built-in “Drum Rack”. One thing I learned all along this process is to try to stick to the tools and devices which are designed from Ableton for that purpose. If the drum rack needs customisation, I’ll search for a workaround. But this approach turned out to be much more reliable and faster.