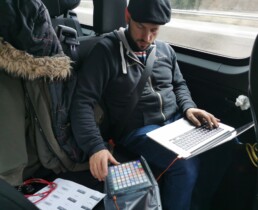
Future Plans
things to do
After writing so much about what I did, I now want to tell you about what ideas I have got for future developments.
From an artistic standpoint, my aim is to play more with this setup and make music. Because it is big and takes some time to build up and pack, I imagine there is potential for an online community where I can perform.
However, there are many things I want to re-program and implement:
Matrix 2.0
I already wrote how the first matrix came together. Just like in the movie, it needs an update from the ground up. I want to store and handle all the date either in a 2 dimensional array, a dictionary or I might even rewrite it as classes
Either way, this would give me much more flexibility. I could even store preset names, presets for pedals etc. with 1 matrix setting. This way I could have a "Total recall" possibility.
But it also means, I have to go through EVERYTHING I programmed so far. I can only do this, if I take 2 weeks off, where I don't have to make music with it.
Retrospective looping
The way my loop recording works at the moment: I press a button, then my machine records. With retrospective looping, it is the other way round. The machine records all the time, when I press a button, it makes a loop out of what I just played.
The first person I saw doing this was Lucky Paul, a percussionist from New Zealand.
It takes off a lot of stress, when you improvise and think: "oh, that was nice." and the press of button later, as it is preserved.
Presets for ambient improvisations
Similar to the matrix 2.0 I plan to have pre-made starting environments for my setup.
OSC / Tablet
At the moment I use my tablet for the display of information, as the connection of my OSC system was unreliable at the beginning. I became a member of "Beardyman" Patreon. He built and re-built his setup for live-looping-beatboxing for the last 12 years. I uses four iPads, all with Lemur, (a similar programm to TouchOSC) and Ableton Live.
With an iPad you have much more possibilities to control things as well as visual feedback.
This as well will require a kind of total re-work.
but for now
Let's make some great music, shall we?
go to the Master Research Overview
session with Markus Birkle
Questions:
- is the overall concept doable?
- strategies for ambient improvisation
- modes of the ct5
- What can be improved in the setup
- tips & tricks?
- Level management
Answers:
- volume swell into reverb and or delay -> solved
- rule of thumb: one pedal -> one function
- ct5 explained how to use it
- drone bass
- few functions that are ALWAYS available and accessible
- fade level control of RME (to do)
- distortion
- album recommendation (guitar player from Nils Petter Molvaer)
- more dirty sounds
- Interview Bugge & Hendrik Schwarz LINK
resulting morning jam
after this session I did a morning jam
go to the Master Research Overview
working on the setup in the bandvan while on tour
It is already February; time is flying. Concerts are picking up again and I have got two upcoming tours with singers which will keep me really busy in the remaining time preceding my graduation concert. Developing and refining my setup turned out to be much more time-consuming than expected.
Being on tour means spending many hours on a bus and backstage, but also away from home and the studio. I had to think about how I could continue working on my setup while being on tour. The thing I probably like the most about Ableton and ClyphX Pro is the flexibility: You can quickly adapt to different situations without having to start from scratch.
I obviously could not take my whole setup on tour, nor the pedals or interface. But, fortunately, a great thing with TotalMix is that it works even without a connected interface. I took my smallest launchpad and programmed its three custom modes according to the other controllers I usually use (a Launchpad X and a Footcontroller FCB1010. I assigned my different CXP control scripts in Ableton to the same launchpad. Then, I just have to switch custom modes on the Launchpad. I even have those 2 expression pedals to check if they are routed correctly.
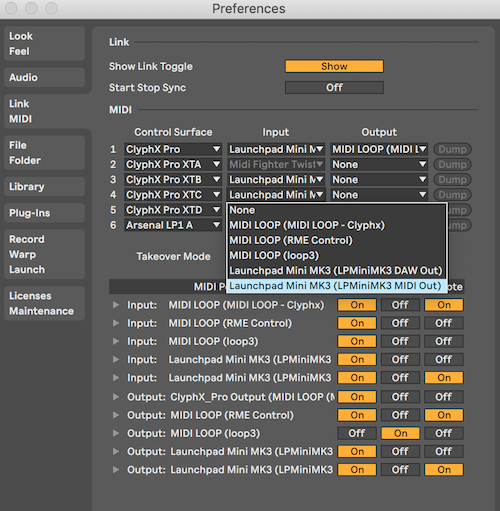
Now I can reprogram, re-arrange my launchpads and script my looping procedures while sitting in the back of the van. I am really satisfied and relieved it works so well. #tourlife, here I come!
go to the Master Research Overview
Lesson with Robert Landfermann
I met twice with Robert and we had inspiring conversations and exchanges of thoughts.
these were my questions
- What unusual playing techniques could I use?
- What were your influences?
- Recommendations on music to listen to
- thoughts on looping.
findings
Recommendations and influences:
- Stefano Scodanibbio
- Barre Philipps
- Mark Dresser
- Epic Conversations Rick Rubin & Pharrell Williams
- Spotify Playlist
Playing techniques: (sound examples will follow)
- don't press fingers totally to get overtones above the string (Pic!).
- turn the bow around and bow with the wood
- press the string over the fingerboard
- pull the string from the side, touching the fingerboard and bow with great force
thoughts on looping
In our conversation he mentioned one thought, which stood out to me: When a loop plays, it should modulate over time to stay interesting.
That inspired me to write a user action which randomises the start and end point of loops in ableton and another user action put these markers back to their original position.
morning jam
I did a morningjam with the techniques I learned with him, see here
go to the Master Research Overview
Acknowledgements
Acknowledgements
In this research I was given the possibility to chase a dream of building my perfect looper and guitar effect pedal station.
This was only possible because I hade massive support. I am forever grateful and want to say thank you to:
my wife and daughter for unconditional love and support. They did not see me very often, because I spend most of my day and night time in the basement in the past two years. I can not imagine how I would have been able to do this.
thanks to my teacher Matthias, not only was he very helpful and competent, it was his positive attitude and feedback which encouraged me to go all the way and strengthened my confidence.
Thank you, John Goldsby. He is a walking encyclopaedia and his insights into the history of double bass playing were priceless.
A big shoutout to the community around ClyphX Pro, Fabian, Darren and foremost Jason, who helped me a great deal with my first user_actions and Max for Live devices.
a big thank you to Michael Terividian of der Gestalter who made my blog look nice and shiny
thanks to Jo Kox and everybody at the Ministry of Culture in Luxembourg, the granted me a generous scholarship for the work on my research.
go to the Master Research Overview
collaboration and the first day out for my rig
My idea for building this rig was to have the possibility to "play" with it as a solo artist and with other musicians. I see my rig more as an instrument in itself rather than a pure effect unit. Together with Julia Warren, an enormously talented sax player, and great improvisator, we booked a day in the studio of the Conservatory in Maastricht.
The plan was to have Julia play into the rig, me looping her and both of us reacting to each others' sounds. Of course, I also played some bass. But in this setting, I could concentrate on being a "knob twister" or "sound manipulator".
What were the goals and questions?
- proof of functionality and practicability: Is the rig reliable and portable to set up anywhere and play with it?
- realisation of different improvising concepts: different leaders, building up layers, variations with fast or slow character
- Find out how the responsiveness and reactivity translate in an audience
- What can be improved
Setting / Conditions
- A studio environment seemed to be an optimal place for this research experiment for the following reasons:
- It has a great acoustic, a beautiful vibe and ambiance
- There are great microphones available
- presence of an independent listener (Louis van Eeten) for feedback
- a set timeframe & pressure, similar to a live situation, although not as strict.
- an "external" player / improviser to have more capacity to focus on my setup.
On the day itself, how did it go?
- Everything was packed in its cases and did fit into my car. (I was in a rush, so unfortunately I don't have any pictures.)
- Setting up my rig went smoothly. It took about 1 hour to set up, measuring and testing audio routing was about 30 minutes. I created a Cubase project with white noise sweeps and sine waves to check that all individual inputs and outputs were connected and leveled correctly.
- For a soundcheck, we did a first improvisation. Musically, it was quite nice, but there was a strange reaction on my Footcontroller. I have four buttons dedicated to recording in four individual loop slots. But they didn't work at all. Even worse, it did something totally unpredictable and recorded in random tracks and multiple tracks simultaneously. I started to look for the bug in my programming. I could not find the glitch and after one hour of searching, I was devastated and hungry, so I sent Louis and Julia for lunch to have more time. After 30 more minutes, I found the error in the macro.txt file.
this:$b1_mode_1$ = setvar rltr %l1% %rr%/STOP NQ; %rr% / PLAY %recclip2%; msg "rec loop 1";
Had to be this:
$b1_mode_1$ =
 setvar rltr %l1%;
 %rr%/STOP NQ;
 %rr% / PLAY %recclip2%;
 msg "rec loop 1";
Do you see the difference? Well, it took me quite a while as well… After almost 7 months of programming, testing, and starting from scratch, I now have some routine in debugging and finding errors.
Relieved, I went to grab a bite and then we were finally ready to record.
For each "run", which we called Chapters, we had different approaches. e.g.:
- Long notes, long build-ups.
- short notes / more staccato
- ambient / dreamy
- driving / groovy
For Chapter 04 we decided to get a drum loop going and to filter it over time. We quickly took a drum loop sample. Nothing fancy, not with many variations in it. The whole session was mainly a proof of concept. It took me a lot of time between having an idea of what to do with an ongoing sound and actually manipulating it with the right pedal etc….
Getting faster and having more muscle memory is probably the field with the greatest potential for improvement.
To me, it was astonishing how time flew. It is really easy to dive in and get lost when making this kind of music, which is a beautiful thing. No chapter was under 10 minutes long.
I filmed everything as well, but I must admit I did not pay enough attention and accurateness while setting up the cameras. Exposure and focus are way off. And then, there was this gigantic mic stand just in front of me. That is why the quality of the video is not as decent as it could have been.
Nevertheless, I am very proud that this session went well and I am even more encouraged to work towards getting this rig on the road…
Thank you, Julia, for taking this exploratory musical path with me. There will be more opportunities soon...
Here are links to the six tracks (Chapters) we recorded:
Chapter 01
Chapter 02
Chapter 03
Chapter 04
Chapter 05
Chapter 06
go to the Master Research Overview
I wrote my first Max for Live Device
I wrote my first Max for Live* Device
I recently integrated a Midi Fighter Twister* into my setup. Here is an article about what I did in detail: Midi Fighter Twister & Clyphx Pro
I encountered one problem, which I could not solve fully to my satisfaction. The workaround was more like a hack than a proper solution. To me, it was always annoying that the playback started when I pressed a knob to change banks.
I had a zoom call with ChainsawArt, a user in the CXP Community, who has programmed a script with TouchOSC and Max 4 Live which amazed me. Although our conversation was about something completely different, I decided to dive into the M4L World and 2 hours later, I had written my first device. It's purpose: Switch in between the 4 banks on the Midi Fighter Twister. As explained in my earlier post, I have to send a Midi CC #0 message, which most M4L devices don't have. The look of the device is not right at all, but it works, and that is its main purpose.
You can download it here MFT Bank Change - M4L Device
That was a very satisfying process, I must say.
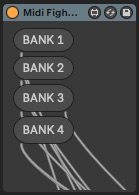
Next on the list is a device which sends the data of the sends of its track to a specific OSC address. ???What??? In other words: I want a visual representation on an iPad to see what loop is sent to which pedal. And I want to reduce the traffic so it should send data only when the parameter is changed. That is called a listener in M4L / Python. (When it's done, I'll link it on here)
*Update: The messed up layout really bothered me. And I knew it is nothing hard to do. After some research and google-di-doodle: dadaaaa. Now it looks like this:

I had to find the option "open device in presentation mode" in the patch's inspector.
escargots de l'espace - scripted looping with ClyphX Pro
Yesterday was kind of a big day or let's say a big step forward. Since I started my solo project, I had many morning jams, which were totally improvised and great for exploring the possibilities of my pedals. But I knew that, at some point, I had to take a turn and work on more structured forms. The whole point of building this complex setup as accessibly as possible was to be able to "script" a looping sequence like in this video, in which I still work with the bink looper*:
Mo’Better Blues - solo bass performance.
It turned out to be more challenging than expected, but once I got unforeseen difficulties sorted out, it now works perfectly well and is as reliable as wished!
composing concept
I thought it would be a good idea to take another approach to start the track. So I decided not to use any pedals for the writing process and instead build up a classic layered looping piece. It is easy to get lost in a sound an effect produces. And at the end of the day, I would have had much fun playing and exploring sound, but not get any composing done, really.
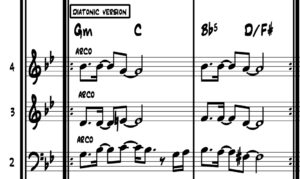
That being said, I came up with this two-bar loop with three voices where I doubled the lowest voice to have a phasing stereo effect. Tonally, it is basically in G-minor. It was very diatonic at first, but I searched for more spicy, more colourful notes and navigate in a close voice leading as well.
At first, it was something like this:
and here is the spiced version I came up with later:
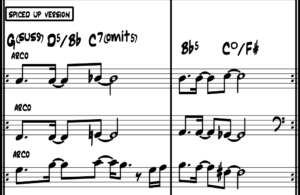
I tried to maintain the impression of the essential chord movement and searched for option notes, like 9,b9 or #11.
For the bass line I found, I did a twist on the dominant D7/F# and turned it into the tritone substitute Ab7. It is a classic bass player move though.
How to write a melody? In the past, I played around until I found something I liked. But I find it hard not to noodle around and find a melody somebody can sing along to. A good melody should be sung in my opinion. Instead of scratching out not-so-well-intonated notes in the higher register of the bass, I sung and recorded that. It felt quite natural to me and I quickly found a melody line I liked. This method is probably quite common and obvious, but it cost me quite an effort to do it.
So, this is the melody I finally came up with:

For the second voice I followed the same workflow, I first went for the obvious third below but then tried to spice it up and it goes like this:

implementation or "reverse engineering"
Now that all musical ingredients are ready on the table, I had to figure out how to turn it into a straight, efficient looping performance.
My first attempts were to write every command needed in a X-clip following the order in which I push my buttons on the launchpad and then trigger it with a button on my foot controller FCB*.
To record 4 loops on tracks 3-6 on scene 1 with 2 bars each the CXP* commands would look like this:
[1st] %slot%=1; %l1%=%looptr3%; %l2%=%looptr4%; %l3%=%looptr5%; %l4%=%looptr6%; %recbars%=2; %loops%=4; namerecclip %recbars% %loops%; %rr%/play %recclip%;
- Let me explain it in more detail:
- %slot%=1
- This sets the variable in which scene the loops will be recorded.
- %l1%=%looptr3%; %l2%=%looptr4%; %l3%=%looptr5%; %l4%=%looptr6%;
- This defines in which tracks the loops will be recorded. As I start with a kind of second voice, I wanted to have tracks 1 and 2 reserved for a bassline, I put them on tracks 3-6. The variable %looptr3% contains the actual name of track 3. I decided to work with variables so that I don't have to correct all those commands in case I change the name of a track.
- %recbars%=2; %loops%=4;
- is pretty self-explanatory. The length of the loops is set to 2 bars and it will record 4 loops in sequence.
- namerecclip %recurs% %loops%; %rr%/play %recclip%;
- This is a simple user_action I programmed myself in python. It takes those two variables and puts them into a string. In this case, the name of the clips is "rec-4loops-2bar" for the un-quantised and the second is "unarm-4loops-2bar". The actual recording is done with two clips, one is un-quantised and triggered immediately and another one is triggered at the next beginning of the bar. That allows me to control the timing of the recording process. Arming and starting unquantised the recording is just fine, but the un-arming of a track too early would cancel the recording. Or, quantisation the recording has to be done to apply any quantisation.
Here are images of those two clips:


Unfortunately and surprisingly it didn't work. It was unreliable and Ableton recorded in wrong tracks without stopping e.t.c. I had a presumption of what was wrong and after testing, I found the problem. As in music, timing is critical. As mentioned earlier, I use a user_action* to generate the right clip names. Usually, every action in an action list is executed one after another. But not with user actions. It took a few milliseconds too long and the command play %recclip% started before the variable %recclip% was set correctly. My solution was to use a NoteTriggerRack which is very helpful with time-critical actions.
I left the assignments for the loop-tracks in the X-Clip and put the other actions into a NoteTriggerRack. I delayed the user_action naming and the recording clip trigger and that made it dead-proof.
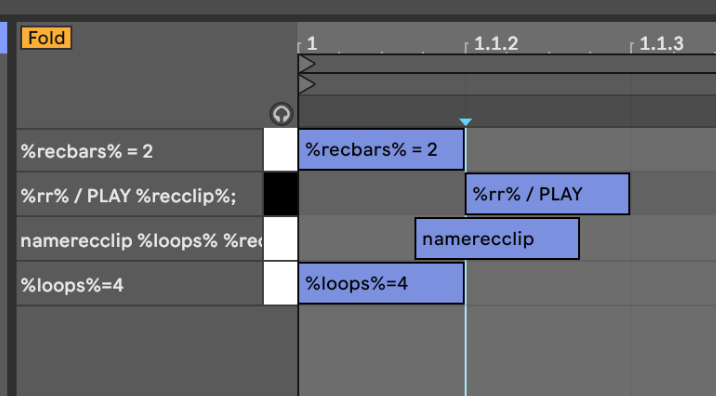
Same for the bassline and melody:
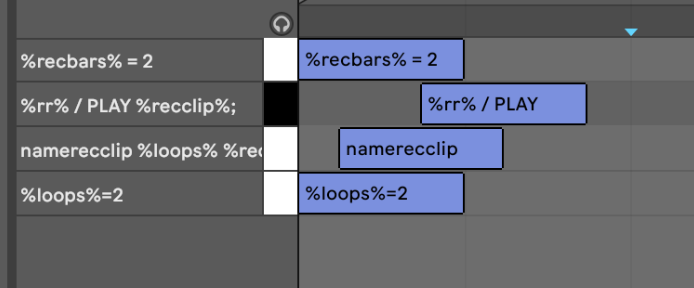
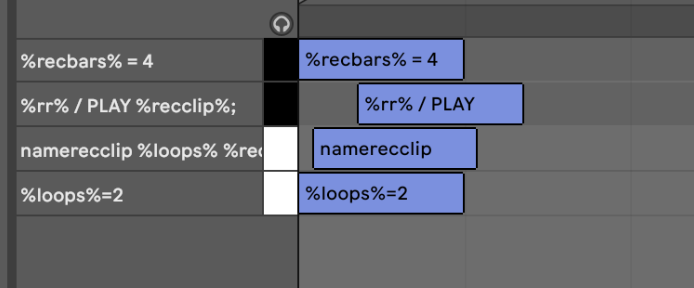
With this setup, I simply press the scene trigger button on my foot-switch(FCB*) anywhere in the bar before, and everything is just fine.
Refinements
What if something goes wrong and I have to cancel a recording or re-record? Of course, that happens and it's important to have a fallback safety net.
I shuffled my foot-switch(FCB*) assignments to find a configuration that is intuitive for me. In my experience that can't be planned, I had to try and refine, try and refine, etc. After a day of playing and refining, it now looks like this:
Focusing on four buttons, two pairs in two rows on top of each other.
All of them have a secondary function (short or long press GC*)
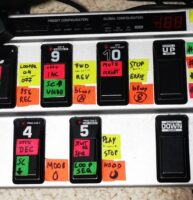
9 is scene up(short press) - nothing yet(long press)
4 is scene down(short press) - scene trigger(long press)
10 recording cancel(short press) - undo (long press)
5 trigger next scene(short press) - recording loop sequence(long press)
beat
A short note on the beat I play later on in the video: That was completely spontaneous. I recently changed the whole setup on how to trigger drum sounds and it is still in a rough state. It is also one of the areas I will work on next. I have got a clear vision and plan for how to tackle this. I will use the Ableton built-in "Drum Rack". One thing I learned all along this process is to try to stick to the tools and devices which are designed from Ableton for that purpose. If the drum rack needs customisation, I'll search for a workaround. But this approach turned out to be much more reliable and faster.
go to the Master Research Overview
Ableton: the brain of my setup
Here is a little video I made for a meeting I couldn't attend. In it, I explain the idea behind my setup and the stages of development I've been working on so far.
Morning Jam #6: Stuttered Bitcrusher
Have a peek into last week's morning jam. Slowly but surely, my setup is coming together but it still feels very raw and shaky. The good news is that the Matrix mixer is working fine and I can now send any effect(?) to any other connected device and back to my table-board.
Musically speaking, this jam is really not a highlight, but I think it's rather inspirational. I hope to get to the writing stage very soon ...
